Getting Started with SurfStack WAMP
SurfStack WAMP is an open source web stack that includes the follow applications: Apache, Nginx, MySQL, MongoDB, and PHP. WAMP actually stands for Windows, Apache, MySQL, and PHP. It’s very similar to the well known, LAMP (L stands for Linux), which is the base installation for most web platforms. In order to get a web site like WordPress, Drupal, or Joomla up and running you need an operating system (Windows, Linux, Mac), a web server (Apache, Nginx, Lighttpd, IIS), a server side web language (PHP, Ruby, ASP.NET), and a database (MySQL, MongoDB, Oracle Database). These applications are so common that they’ve been abbreviated and represent a “basic web stack”. LAMP is a much more prevalent term because most many web servers run on a Linux machine. Linux is popular because it is open source (which means it’s free) and because it’s very stable. There are millions of people that contribute to the open source Linux projects so there are a lot of people fixing bugs and patching security vulnerabilities because they
want to contribute. One of the big down sides of open source software is the lack of technical support. Who really wants to support software that is free?
If you look at the percentages of people that use Microsoft Windows as an operating system, you’ll probably find that over 75% use Microsoft Windows. Web servers are more difficult to setup on a Windows machine because you actually have to download and install the software manually while on a Linux machine, you can type in a bunch of commands and have the package manager install them for you. In comes WAMP, an easy way to get a web server, web language, and database up a running quickly on Windows.
There are few different WAMP solutions out on the internet. The one I’m going to walk through using is one I’ve developed and one that I use for all my web projects. It’s nice and quick to setup and now supports SSL so I can test out secure websites easily. First, download the latest release of SurfStack WAMP. Extract the files to a folder of your choosing. When you open the folder, you’ll see three items: a folder named amp, a folder named webroot, and a file name SSWamp.exe.

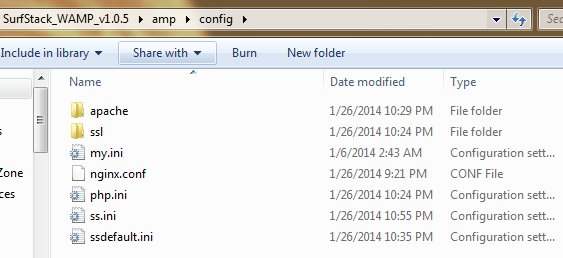
The amp folder contains all the application files for Apache, MySQL, etc. The folder also contains the modified configuration files that enables the applications to work together without any further customization.
If you navigate back to the root folder, you’ll see see another folder called webroot. Inside, you’ll see a localhost folder and inside that folder, you’ll see a public folder. This is where the actual web files for WordPress, Drupal, or your own custom web site will be stored. If you again, navigate back to the root folder, you’ll see a file called SSWamp.exe. Double click on the file to run it. SSWamp.exe is essentially the control panel for the entire web stack. The program was designed to modify the application configuration files, start and stop the applications, and ease the use of a few other tools like Composer (a dependency manager for PHP) and PHPUnit (a PHP testing framework). Once the application starts, you’ll see the interface.

At the top of the application, you’ll see the menus. The Edit and View menus allow you to easy edit the startup and running configurations, respectively. The Explore menu contains links to the different folders so it’s easy to navigate. The Settings menu allows you to change various application settings like the HTTP and HTTPS ports. The Tools menu contains links to scripts that can automate the installation of the popular PHP tools as well as the generation of SSL certificates. Under the menu, are checkboxes that allow you to easily automate the starting and stopping of applications. To get started, place a check next to the Apache checkbox. The status image next to Apache should turn red which means it is stopped. At the bottom of the application, there are four buttons. The first button, Turn On, will obviously start the checked applications. Once started, the text on the button will say Turn Off. Simply click the button again to stop all the checked applications. The next two buttons will open the unencrypted (HTTP) and encrypted (HTTPS) webpages on your current machine. Once Apache is running, click Browse HTTP. Your default web browser should open to the following address, http://localhost, which is the address of your own computer on port 80. You should see the following message:
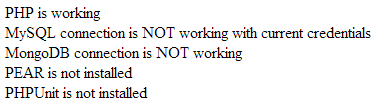
If you see the above message, it means that you’ve successfully set up the Apache web server and the PHP web language on your computer! The file that is being processed to display output on your web browser is located here: webroot\localhost\public\index.php.
Let’s talk through what is actually happening right now. When you click the Turn On button, you’re turning on the Apache web server. Your computer has about 65,000 ports that can be used by different applications. Think of the ports as doors to the internet. If all the doors are closed, nothing on the internet can talk to your computer. When you turn on Apache, you open port 80 which accepts and responds to any requests sent to it. When you open a web browser and you type in an address, you send a request to the computer at that address on port 80 (usually) or port 443 (if it’s encrypted via HTTPS). The response is essentially the information you see on the web page. When you open your own web browser and type in http://localhost, your browser sends a request to Apache which is listening on port 80. Apache then responds with the contents of the web page you requested. The request of http://localhost actually calls http://localhost/index.php or http://localhost/index.html depending on how the Apache is configured.
Now that you have a web server up and running, try to create your first PHP-enabled page if you have not already. Happy coding!